
Installation
This section will help you set up Sunrise server on your local environment.
We are going to set up “Production” ready environment, for this we are going to use Solar System Orchestrator.
Solar System is an orchestration tool that simplifies the deployment and management of Sunrise and its related components using Docker. It provides easy setup and configuration for server administrators with versioning support.
If you are more interested in development setup, please refer to the Contributing section.
Prerequisites
Section titled “Prerequisites”Before you start, make sure you have the following installed on your machine:
- Docker: For running the server and other components.
- Git: For cloning the repositories.
- Text Editor: Optional, but recommended. But you can use any text editor you like.
Docker will do the heavy lifting for you, so you don’t need to worry about installing any technologies like Redis, MySQL, Grafana, etc.
Setting up the Server
Section titled “Setting up the Server”1. Cloning the Repositories
Section titled “1. Cloning the Repositories”First, we need to clone the Solar System repository with submodules. Open your terminal and run the following commands:
git clone --recursive https://github.com/SunriseCommunity/Solar-System.gitcd Solar-SystemOr if you’ve already cloned without submodules:
git submodule update --init --recursive --remote2. Configuring Sunrise
Section titled “2. Configuring Sunrise”Solar System uses a single .env file (for infrastructure + ports + domains) and a single Sunrise config file.
Create copies of the example configuration files:
cp .env.example .envcp Sunrise.Config.Production.json.example Sunrise.Config.Production.jsonFill in the required parameters in both files.
3. Generate API keys
Section titled “3. Generate API keys”Sunrise needs a token secret for API requests, and Observatory uses an API key so Sunrise can request it without internal rate limits.
Generate the token secret for Sunrise API requests:
chmod +x lib/scripts/generate-api-sunrise-key.sh./lib/scripts/generate-api-sunrise-key.shGenerate the Observatory API key:
chmod +x lib/scripts/generate-observatory-api-key.sh./lib/scripts/generate-observatory-api-key.sh4. Running the Server
Section titled “4. Running the Server”Now that we have everything set up, we can run the server.
Start the stack:
chmod +x ./start.sh./start.shYou can check that all containers are running with:
docker psAccessing the Server
Section titled “Accessing the Server”To make your server accessible on the internet:
1. Configure DNS records
Section titled “1. Configure DNS records”Make sure you have DNS records pointing the following subdomains to your server’s IP address:
*(wildcard)apiosuacassetschoc4bgrafana
These subdomains are required for the server to function properly.
2. Start Caddy reverse proxy
Section titled “2. Start Caddy reverse proxy”For simplicity, we use Caddy as a reverse proxy. By default, the Caddyfile is configured to host the website, server, and Grafana. You can uncomment additional configurations in the Caddyfile if needed.
Start Caddy by running in the Solar-System directory:
sudo caddy start --envfile .envNow, you should be able to test connection to the server using https://cho.<your WEB_DOMAIN> in your browser.

You should see the face of a beautiful mister. :) :tada:
3. Test if the server is accessible
Section titled “3. Test if the server is accessible”Connecting to the Server using osu! client
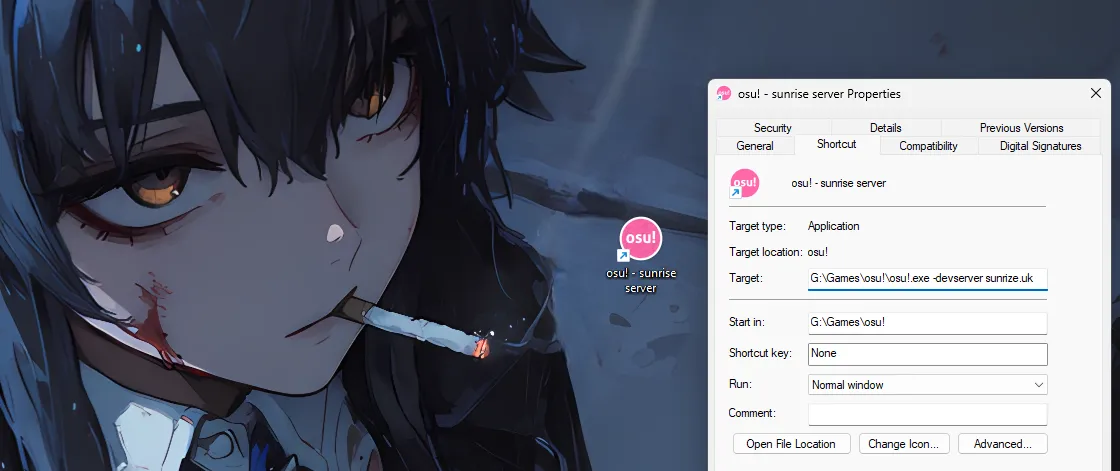
Section titled “Connecting to the Server using osu! client”Add a launch argument -devserver <your WEB_DOMAIN> to your osu! shortcut.
For example:
-devserver <your WEB_DOMAIN>After that, you can launch the osu! client and should be able to connect to the server.
Opening the Website using web browser
Section titled “Opening the Website using web browser”Sunset is included in Solar System and should start automatically with the stack.
By default you can access the website at https://<your WEB_DOMAIN>.
Something went wrong?
Section titled “Something went wrong?”If you encounter any issues during the setup process, please check the following:
- Make sure you have followed all the steps correctly.
- Check the logs of the Docker containers for any errors.
- If you are still having issues, feel free to open an issue on the Sunrise repository or ask for help in the Sunrise Discord server.
What’s next?
Section titled “What’s next?”Now that you have the server up and running, you can start exploring its features and capabilities.
Please follow the Configuration section to learn how to manage the server.
You will learn how to:
- Update website branding (logo, colors, etc.)
- Recieve admin privileges
- Manage beatmaps (rank, love, derank beatmaps, etc.)
- View player statistics
- And more!