
Installation - Local Setup
This guide walks you through setting up Sunrise server locally on your machine using Solar System with self-signed certificates. This is useful for testing, development, or running a private server that doesn’t need to be accessible from the internet.
Unlike the standard Installation guide which targets a production deployment, this guide uses docker-compose.local.yml and the .local helper scripts included in Solar System.
Prerequisites
Section titled “Prerequisites”Before you start, make sure you have the following installed on your machine:
- Docker: For running the server and other components.
- Git: For cloning the repositories.
- Text Editor: Optional, but recommended. Any text editor will work.
- Administrator Privileges: Required for editing the
hostsfile and installing certificates. - OpenSSL (optional): Only needed if you want to generate certificates via the command line instead of using an online tool.
Docker will do the heavy lifting for you, so you don’t need to worry about installing any technologies like Redis, MySQL, Grafana, etc.
Setting up the Server
Section titled “Setting up the Server”1. Cloning the Repository
Section titled “1. Cloning the Repository”First, clone the Solar System repository with submodules. Open your terminal and run the following commands:
git clone --recursive https://github.com/SunriseCommunity/Solar-System.gitcd Solar-SystemOr if you’ve already cloned without submodules:
git submodule update --init --recursive --remote2. Update the hosts File
Section titled “2. Update the hosts File”Since you are hosting locally, your machine needs to know that sunrise.local and its subdomains should resolve to 127.0.0.1.
On Windows, open C:\Windows\System32\drivers\etc\hosts with administrator privileges.
On Linux/macOS, open /etc/hosts with sudo.
Add the following entries at the end of the file:
# Sunrise Web Section
127.0.0.1 sunrise.local127.0.0.1 api.sunrise.local
# Sunrise osu! Section
127.0.0.1 osu.sunrise.local127.0.0.1 a.sunrise.local127.0.0.1 c.sunrise.local127.0.0.1 assets.sunrise.local127.0.0.1 cho.sunrise.local127.0.0.1 c4.sunrise.local127.0.0.1 b.sunrise.local3. Creating Self-Signed Certificates
Section titled “3. Creating Self-Signed Certificates”The local Docker Compose setup runs the Sunrise server directly on HTTPS (port 443) using Kestrel, so you need a self-signed certificate for the sunrise.local domain.
Option A: Using an online generator (recommended)
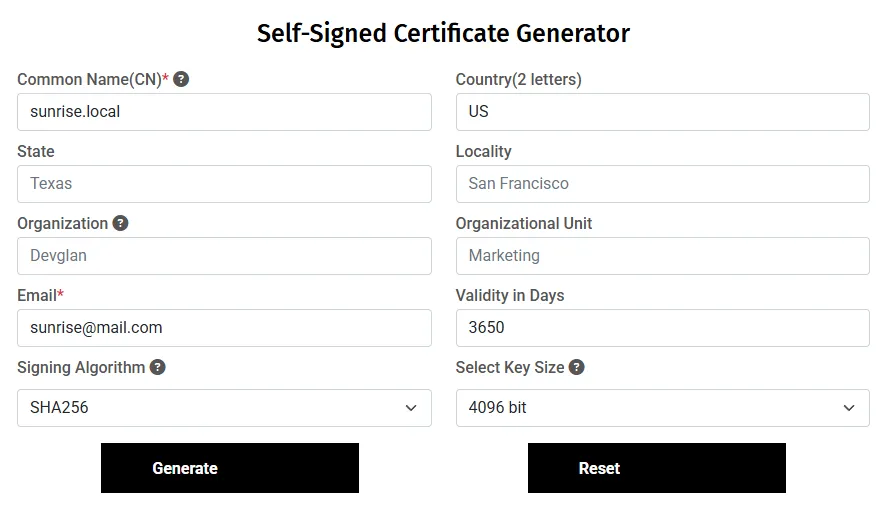
Section titled “Option A: Using an online generator (recommended)”You can use an online generator to create self-signed certificates. We recommend using Devglan’s Self-Signed Certificate Generator with the following settings:
- Common Name (CN):
sunrise.local - Email:
[email protected] - Validity:
3650(10 years) - Signing Algorithm:
SHA256 - Key Size:
4096 bit
After generating the certificate, click “Download All” to download the certificate and private key files.
Now, generate a PKCS12 file (PFX) from the downloaded files using any online converter or OpenSSL.
You can use SSL Trust PFX File Generator for this. Upload the downloaded certificate (certificate.cer) and private key file (privateKey.key) and click “Create / Download PFX File”.
Rename the generated PFX file to certificate.pfx and move it to the Sunrise/ directory inside Solar System:
Solar-System/├── Sunrise/│ ├── certificate.pfx <-- Place it here│ └── ...├── docker-compose.local.yml└── ...Finally, install the certificate to the Trusted Root Certification Authorities store so your browser and osu! client will trust it:
- Windows: Double-click the
certificate.cerfile and install it to the Trusted Root store, or run:Terminal window certutil -addstore -f "ROOT" certificate.cer - Linux/macOS: Copy the
.cerfile to/usr/local/share/ca-certificates/and run:Terminal window sudo update-ca-certificates
Option B: Using OpenSSL (advanced)
Section titled “Option B: Using OpenSSL (advanced)”Generate a self-signed certificate for sunrise.local and all its subdomains:
openssl req -x509 -newkey rsa:4096 -sha256 -days 3650 -nodes \ -keyout sunrise.local.key -out sunrise.local.crt \ -subj "/CN=sunrise.local" \ -addext "subjectAltName=DNS:sunrise.local,DNS:*.sunrise.local,IP:127.0.0.1"Convert it to PKCS12 format (PFX) for ASP.NET:
openssl pkcs12 -export -out certificate.pfx -inkey sunrise.local.key -in sunrise.local.crt -password pass:passwordMove certificate.pfx to the Sunrise/ directory:
Solar-System/├── Sunrise/│ ├── certificate.pfx <-- Place it here│ └── ...├── docker-compose.local.yml└── ...Import the certificate to the Trusted Root store:
- Windows:
Terminal window certutil -addstore -f "ROOT" sunrise.local.crt - Linux/macOS:
Terminal window sudo cp sunrise.local.crt /usr/local/share/ca-certificates/sunrise.local.crtsudo update-ca-certificates
4. Configuring Sunrise
Section titled “4. Configuring Sunrise”Create copies of the example configuration files:
cp .env.example .envcp Sunrise.Config.Production.json.example Sunrise.Config.Production.jsonOpen the .env file and make sure to set the following values:
WEB_DOMAIN=sunrise.localSUNRISE_KESTREL_CERTIFICATES_DEFAULT_PASSWORD=passwordFill in the rest of the required parameters in both .env and Sunrise.Config.Production.json.
5. Generate API Keys
Section titled “5. Generate API Keys”Generate the token secret for Sunrise API requests:
chmod +x lib/scripts/generate-api-sunrise-key.sh./lib/scripts/generate-api-sunrise-key.shGenerate the Observatory API key:
chmod +x lib/scripts/generate-observatory-api-key.sh./lib/scripts/generate-observatory-api-key.sh6. Running the Server
Section titled “6. Running the Server”Now that everything is configured, start the server using the local scripts:
chmod +x ./start.local.sh./start.local.shThe script will use docker-compose.local.yml automatically and prompt you whether to build the containers. On first run, choose yes to build everything.
You can verify that all containers are running with:
docker psAccessing the Server
Section titled “Accessing the Server”Unlike the production setup, the local setup does not require Caddy or any external reverse proxy. The Sunrise server handles HTTPS directly via Kestrel on port 443.
Connecting to the Server using osu! Client
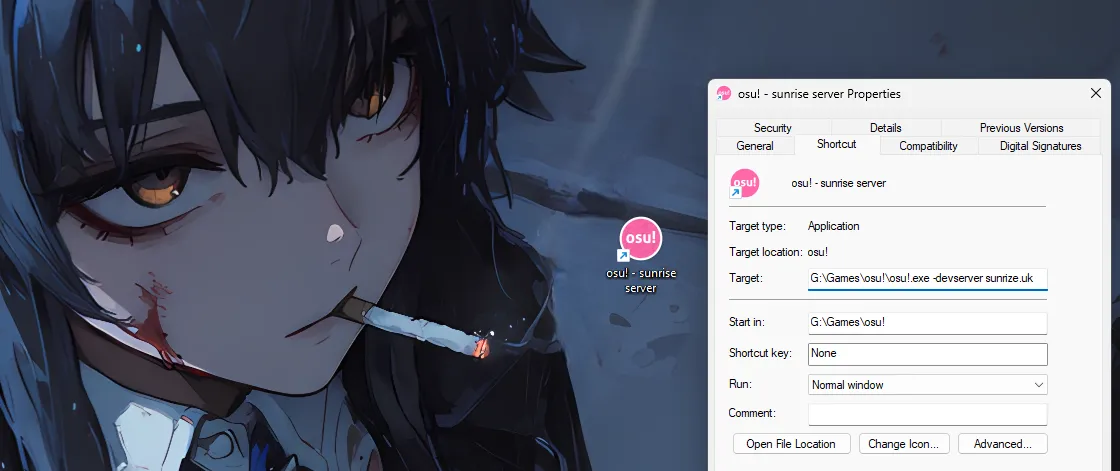
Section titled “Connecting to the Server using osu! Client”Add a launch argument -devserver sunrise.local to your osu! shortcut:
-devserver sunrise.localAfter that, launch the osu! client and you should be able to connect to the server.
Opening the Website
Section titled “Opening the Website”Sunset is included in Solar System and starts automatically with the local stack.
By default you can access the website at http://localhost:3090.
Checking the Server Status
Section titled “Checking the Server Status”You can test the server connection by navigating to https://cho.sunrise.local in your browser.

You should see the face of a beautiful mister. :) :tada:
Monitoring with Grafana
Section titled “Monitoring with Grafana”Grafana is included in the local stack. You can access it at http://localhost:3060 (or whatever port you set for GRAFANA_PORT in .env).
On the first login, use admin as both the username and password. You will be prompted to change the password.
Managing the Local Server
Section titled “Managing the Local Server”Solar System provides .local script variants for all common operations:
| Action | Linux / macOS | Windows |
|---|---|---|
| Start | ./start.local.sh | .\start.local.bat |
| Stop | ./stop.local.sh | .\stop.local.bat |
| Update | ./update.local.sh | .\update.local.bat |
These scripts always target docker-compose.local.yml, so you don’t need to specify the compose file manually.
Something Went Wrong?
Section titled “Something Went Wrong?”If you encounter any issues during the setup process, check the following:
- Make sure your
hostsfile entries are correct and saved. - Verify the certificate is installed in the Trusted Root store.
- Ensure
SUNRISE_KESTREL_CERTIFICATES_DEFAULT_PASSWORDin.envmatches the password used when generatingcertificate.pfx. - Check the logs of the Docker containers for errors:
Terminal window docker logs <container-name> - If you are still having issues, feel free to open an issue on the Sunrise repository or ask for help in the Sunrise Discord server.
What’s Next?
Section titled “What’s Next?”Now that you have the server running locally, you can start exploring its features and capabilities.
Please follow the Configuration section to learn how to manage the server.